Documentation Index
Fetch the complete documentation index at: https://docs.ardor.cloud/llms.txt
Use this file to discover all available pages before exploring further.
Overview
Create a service from scratch when you want complete control over your codebase. Start with an empty project, write your code, and define exactly how your application builds and runs.When to use this: Building custom applications, APIs, or services where you want to write all the code yourself or have Cerebrum help you build from a blank slate.
Why Start Empty
Full control
You decide everything — language, framework, dependencies, and architecture.
Clean slate
No legacy code or opinions. Build exactly what you need.
Cerebrum-powered
Let Cerebrum write your code, or do it yourself. Your choice.
Any language
Python, Node.js, Go, Rust, Java — anything that runs in a container.
Before You Start
You'll need a Dockerfile
You'll need a Dockerfile
Empty services require a
Dockerfile in the project root to deploy. The dev container works without one, but deployments need it.Know your stack
Know your stack
Decide on your programming language and framework before starting. This helps Cerebrum assist you more effectively.
Dev container available immediately
Dev container available immediately
The development container starts right away with a terminal. You can install dependencies and run code before writing a Dockerfile.
Export to GitHub later
Export to GitHub later
You can always connect your service to GitHub later to enable version control and local development.
Creating an Empty Service
- 1. Add Service
- 2. Service Created
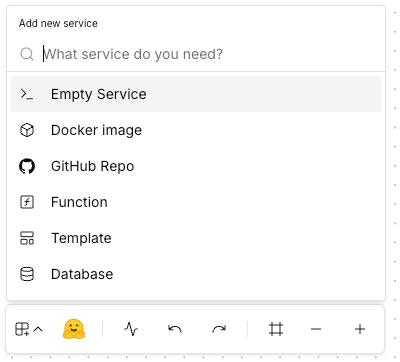
After creation, Ardor initializes a dev container. Once ready, you can start adding code with Cerebrum’s help.
Project Structure
An empty service starts with a minimal structure. Here’s how to organize your code:- Python
- Node.js
- Go
Adding Your First Code
Step 1: Open the Code Editor
Click Code Editor in the toolbar to access your project files. Create your main application file.Step 2: Write Your Application
Here’s a minimal “Hello World” for common languages:- Python (Flask)
- Node.js (Express)
- Go
app.pyrequirements.txt
Dockerfile Setup
Create aDockerfile in your project root for deployments:
- Python
- Node.js
- Go
Dockerfile Requirements
Your Dockerfile must:
- EXPOSE the port your app listens on
- CMD or ENTRYPOINT to start your application
- Read
PORTfrom environment variable for flexibility
Development Workflow
Using the Dev Container
The development container provides a live environment for rapid iteration:- Terminal Access: Install dependencies, run commands, debug issues
- Hot Reload: Changes reflect immediately (with proper setup)
- Dev URL: Test your app via the unique development URL
Setting Up app_entrypoint.sh
Createapp_entrypoint.sh to automatically start your app when the dev container restarts:
- Python
- Node.js
- Go
Without
app_entrypoint.sh, the dev container starts but doesn’t run your app. You’ll need to start it manually via the terminal.Testing Your App
- Wait for the dev container to initialize
- Open the Dev URL from the service panel
- Your app should respond on the configured port
Deploying Your Service
Once your code and Dockerfile are ready:- Click Deploy in the top-right corner
- Ardor builds your Docker image from the Dockerfile
- The built image is deployed to the selected environment
- Your service is accessible via the deployment URL
Build logs are available in the Logs tab. Check them if deployment fails.
Best Practices
Start with the dev container
Start with the dev container
Use the terminal to prototype and test before writing the Dockerfile. It’s faster for iteration.
Use environment variables
Use environment variables
Never hardcode configuration. Use
os.environ (Python), process.env (Node.js), or os.Getenv (Go).Keep images small
Keep images small
Use slim/alpine base images. Multi-stage builds reduce final image size significantly.
Pin dependency versions
Pin dependency versions
Lock versions in
requirements.txt, package-lock.json, or go.sum for reproducible builds.Add health checks
Add health checks
Implement a
/health endpoint for monitoring. Ardor uses this to verify your service is running.Using Cerebrum
Let Cerebrum help you build your service:- Open Copilot from the toolbar
- Describe what you want: “Create a REST API with user authentication”
- Cerebrum generates code, Dockerfile, and configuration
- Review and iterate with follow-up requests
Build with Cerebrum
Learn how Cerebrum can write code, debug issues, and deploy your services automatically.
Troubleshooting
Dockerfile not found
Dockerfile not found
Cause: Missing
Dockerfile in project root.Solution: Create a Dockerfile (case-sensitive) in the root directory, not in a subdirectory.Build fails with dependency errors
Build fails with dependency errors
Cause: Missing or incompatible dependencies.Solution:
- Verify your dependency file exists (
requirements.txt,package.json, etc.) - Test dependency installation in the dev container first
- Check for version conflicts
App not accessible after deploy
App not accessible after deploy
Cause: Port mismatch or binding to localhost.Solution:
- Ensure your app reads the
PORTenvironment variable - Bind to
0.0.0.0, notlocalhost - Verify the
EXPOSEport matches your app’s port
Dev container app not starting
Dev container app not starting
Cause: Missing or broken
app_entrypoint.sh.Solution:- Check
app_entrypoint.shexists and is executable - Verify the script syntax (use
bash -n app_entrypoint.shto check) - Run commands manually in terminal to debug
Changes not reflecting in dev container
Changes not reflecting in dev container
Cause: Need to restart the container or app.Solution:
- For code changes: Restart your app process
- For dependency changes: Restart the dev container
- Some frameworks support hot reload — configure them for faster iteration
What’s Next
Connect to GitHub
Version control your code and enable local development with your IDE
Add Environment Variables
Configure secrets and environment-specific settings
Networking
Configure public/private access and connect to other services
Variables & Secrets
Store API keys, passwords, and configuration securely