> ## Documentation Index
> Fetch the complete documentation index at: https://docs.ardor.cloud/llms.txt
> Use this file to discover all available pages before exploring further.
# Empty Service
> Start with a blank project and build your service from scratch. Full control over your codebase, Dockerfile, and development workflow.
## Overview
Create a service from scratch when you want complete control over your codebase. Start with an empty project, write your code, and define exactly how your application builds and runs.
**Cerebrum can build it for you.** Describe what you want — "create a REST API with user auth" — and Cerebrum will write the code, Dockerfile, and configuration. The details below are for when you want to understand or do it manually.
**When to use this:** Building custom applications, APIs, or services where you want to write all the code yourself or have Cerebrum help you build from a blank slate.
## Why Start Empty
You decide everything — language, framework, dependencies, and architecture.
No legacy code or opinions. Build exactly what you need.
Let Cerebrum write your code, or do it yourself. Your choice.
Python, Node.js, Go, Rust, Java — anything that runs in a container.
**Best for:** Custom APIs, web applications, microservices, and any project where you're writing the code from scratch.
## Before You Start
Empty services require a `Dockerfile` in the project root to deploy. The dev container works without one, but deployments need it.
Decide on your programming language and framework before starting. This helps Cerebrum assist you more effectively.
The development container starts right away with a terminal. You can install dependencies and run code before writing a Dockerfile.
You can always connect your service to GitHub later to enable version control and local development.
## How to create
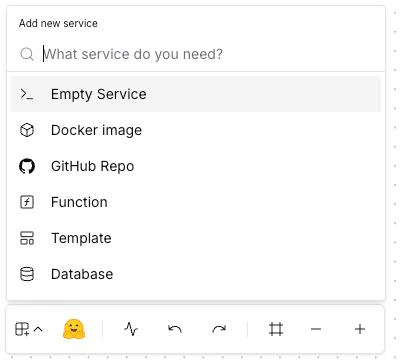 Click **Add Service** → select **Empty Service**
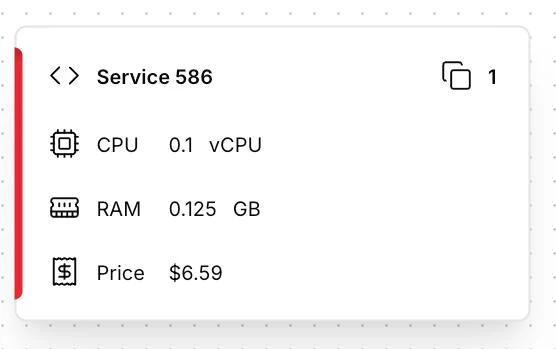 Service appears with a default name (e.g., `Service 1`) — rename it to something descriptive
## Project Structure
An empty service should start with a minimal structure. Here's how to organize your code:
```
/
├── app.py # Main application
├── requirements.txt # Dependencies
└── Dockerfile # Build instructions
```
```
/
├── src/
│ └── index.js # Main application
├── package.json # Dependencies
└── Dockerfile # Build instructions
```
```
/
├── main.go # Main application
├── go.mod # Dependencies
└── Dockerfile # Build instructions
```
## Adding Your First Code
### Step 1: Open the Code Editor
Click **Code Editor** in the toolbar to access your project files. Create your main application file.
### Step 2: Write Your Application
Here's a minimal "Hello World" for common languages:
**app.py**
```python theme={null}
import os
from flask import Flask
app = Flask(__name__)
port = int(os.environ.get('PORT', 8080))
@app.route('/')
def hello():
return {'message': 'Hello from Ardor!'}
if __name__ == '__main__':
app.run(host='0.0.0.0', port=port)
```
**requirements.txt**
```
flask==3.0.0
```
**src/index.js**
```javascript theme={null}
const express = require('express');
const app = express();
const port = process.env.PORT || 8080;
app.get('/', (req, res) => {
res.json({ message: 'Hello from Ardor!' });
});
app.listen(port, '0.0.0.0', () => {
console.log(`Server running on port ${port}`);
});
```
**package.json**
```json theme={null}
{
"name": "my-service",
"version": "1.0.0",
"main": "src/index.js",
"scripts": {
"start": "node src/index.js"
},
"dependencies": {
"express": "^4.18.2"
}
}
```
**main.go**
```go theme={null}
package main
import (
"encoding/json"
"net/http"
"os"
)
func main() {
port := os.Getenv("PORT")
if port == "" {
port = "8080"
}
http.HandleFunc("/", func(w http.ResponseWriter, r *http.Request) {
w.Header().Set("Content-Type", "application/json")
json.NewEncoder(w).Encode(map[string]string{
"message": "Hello from Ardor!",
})
})
http.ListenAndServe("0.0.0.0:"+port, nil)
}
```
**go.mod**
```
module myservice
go 1.21
```
Always bind to `0.0.0.0`, not `localhost` or `127.0.0.1`. This allows the container to accept external connections.
## Dockerfile Setup
Create a `Dockerfile` in your project root for deployments:
```dockerfile theme={null}
FROM python:3.12-slim
WORKDIR /app
COPY requirements.txt .
RUN pip install --no-cache-dir -r requirements.txt
COPY . .
EXPOSE 8080
CMD ["python", "app.py"]
```
```dockerfile theme={null}
FROM node:20-alpine
WORKDIR /app
COPY package*.json ./
RUN npm ci --only=production
COPY . .
EXPOSE 8080
CMD ["npm", "start"]
```
```dockerfile theme={null}
FROM golang:1.21-alpine AS builder
WORKDIR /app
COPY . .
RUN go build -o main .
FROM alpine:latest
WORKDIR /app
COPY --from=builder /app/main .
EXPOSE 8080
CMD ["./main"]
```
Your Dockerfile must:
* **EXPOSE** the port your app listens on
* **CMD** or **ENTRYPOINT** to start your application
* Read `PORT` from environment variable for flexibility
## Best Practices
Use the terminal to prototype and test before writing the Dockerfile. It's faster for iteration.
Never hardcode configuration. Use `os.environ` (Python), `process.env` (Node.js), or `os.Getenv` (Go).
Use slim/alpine base images. Multi-stage builds reduce final image size significantly.
Lock versions in `requirements.txt`, `package-lock.json`, or `go.sum` for reproducible builds.
Implement a `/health` endpoint for monitoring. Ardor uses this to verify your service is running.
## Troubleshooting
**Cause:** Missing `Dockerfile` in project root.
**Solution:** Create a `Dockerfile` (case-sensitive) in the root directory, not in a subdirectory.
**Cause:** Missing or incompatible dependencies.
**Solution:**
* Verify your dependency file exists (`requirements.txt`, `package.json`, etc.)
* Test dependency installation in the dev container first
* Check for version conflicts
**Cause:** Port mismatch or binding to localhost.
**Solution:**
* Ensure your app reads the `PORT` environment variable
* Bind to `0.0.0.0`, not `localhost`
* Verify the `EXPOSE` port matches your app's port
**Cause:** Need to restart the container or app.
**Solution:**
* For code changes: Restart your app process
* For dependency changes: Restart the dev container
* Some frameworks support hot reload — configure them for faster iteration
## What's Next
Version control your code and enable local development with your IDE
Configure secrets and environment-specific settings
Configure public/private access and connect to other services
Store API keys, passwords, and configuration securely
Service appears with a default name (e.g., `Service 1`) — rename it to something descriptive
## Project Structure
An empty service should start with a minimal structure. Here's how to organize your code:
```
/
├── app.py # Main application
├── requirements.txt # Dependencies
└── Dockerfile # Build instructions
```
```
/
├── src/
│ └── index.js # Main application
├── package.json # Dependencies
└── Dockerfile # Build instructions
```
```
/
├── main.go # Main application
├── go.mod # Dependencies
└── Dockerfile # Build instructions
```
## Adding Your First Code
### Step 1: Open the Code Editor
Click **Code Editor** in the toolbar to access your project files. Create your main application file.
### Step 2: Write Your Application
Here's a minimal "Hello World" for common languages:
**app.py**
```python theme={null}
import os
from flask import Flask
app = Flask(__name__)
port = int(os.environ.get('PORT', 8080))
@app.route('/')
def hello():
return {'message': 'Hello from Ardor!'}
if __name__ == '__main__':
app.run(host='0.0.0.0', port=port)
```
**requirements.txt**
```
flask==3.0.0
```
**src/index.js**
```javascript theme={null}
const express = require('express');
const app = express();
const port = process.env.PORT || 8080;
app.get('/', (req, res) => {
res.json({ message: 'Hello from Ardor!' });
});
app.listen(port, '0.0.0.0', () => {
console.log(`Server running on port ${port}`);
});
```
**package.json**
```json theme={null}
{
"name": "my-service",
"version": "1.0.0",
"main": "src/index.js",
"scripts": {
"start": "node src/index.js"
},
"dependencies": {
"express": "^4.18.2"
}
}
```
**main.go**
```go theme={null}
package main
import (
"encoding/json"
"net/http"
"os"
)
func main() {
port := os.Getenv("PORT")
if port == "" {
port = "8080"
}
http.HandleFunc("/", func(w http.ResponseWriter, r *http.Request) {
w.Header().Set("Content-Type", "application/json")
json.NewEncoder(w).Encode(map[string]string{
"message": "Hello from Ardor!",
})
})
http.ListenAndServe("0.0.0.0:"+port, nil)
}
```
**go.mod**
```
module myservice
go 1.21
```
Always bind to `0.0.0.0`, not `localhost` or `127.0.0.1`. This allows the container to accept external connections.
## Dockerfile Setup
Create a `Dockerfile` in your project root for deployments:
```dockerfile theme={null}
FROM python:3.12-slim
WORKDIR /app
COPY requirements.txt .
RUN pip install --no-cache-dir -r requirements.txt
COPY . .
EXPOSE 8080
CMD ["python", "app.py"]
```
```dockerfile theme={null}
FROM node:20-alpine
WORKDIR /app
COPY package*.json ./
RUN npm ci --only=production
COPY . .
EXPOSE 8080
CMD ["npm", "start"]
```
```dockerfile theme={null}
FROM golang:1.21-alpine AS builder
WORKDIR /app
COPY . .
RUN go build -o main .
FROM alpine:latest
WORKDIR /app
COPY --from=builder /app/main .
EXPOSE 8080
CMD ["./main"]
```
Your Dockerfile must:
* **EXPOSE** the port your app listens on
* **CMD** or **ENTRYPOINT** to start your application
* Read `PORT` from environment variable for flexibility
## Best Practices
Use the terminal to prototype and test before writing the Dockerfile. It's faster for iteration.
Never hardcode configuration. Use `os.environ` (Python), `process.env` (Node.js), or `os.Getenv` (Go).
Use slim/alpine base images. Multi-stage builds reduce final image size significantly.
Lock versions in `requirements.txt`, `package-lock.json`, or `go.sum` for reproducible builds.
Implement a `/health` endpoint for monitoring. Ardor uses this to verify your service is running.
## Troubleshooting
**Cause:** Missing `Dockerfile` in project root.
**Solution:** Create a `Dockerfile` (case-sensitive) in the root directory, not in a subdirectory.
**Cause:** Missing or incompatible dependencies.
**Solution:**
* Verify your dependency file exists (`requirements.txt`, `package.json`, etc.)
* Test dependency installation in the dev container first
* Check for version conflicts
**Cause:** Port mismatch or binding to localhost.
**Solution:**
* Ensure your app reads the `PORT` environment variable
* Bind to `0.0.0.0`, not `localhost`
* Verify the `EXPOSE` port matches your app's port
**Cause:** Need to restart the container or app.
**Solution:**
* For code changes: Restart your app process
* For dependency changes: Restart the dev container
* Some frameworks support hot reload — configure them for faster iteration
## What's Next
Version control your code and enable local development with your IDE
Configure secrets and environment-specific settings
Configure public/private access and connect to other services
Store API keys, passwords, and configuration securely